1. Add a new field on Timecard Entry page which will allow users to select State value while entering the time. This location information should be stored as Attribute1 of the OHUGLOCATION context in OTL Time Store.
2. Cost Center field is to be removed.
3. State location information should be available to the Approver on Mass Timecard Approval screen and the Workflow notification page.
To keep the changes simple, In this entry I will cover only the steps required for the addition of new Context OHUGLOCATION in the OTL Time Store and the further steps to create/add the corresponding mapping component which will allow this value to get stored in proper place in Time Store without any code change. As we are talking about cost center attribute, its clear that it is a Payroll Time Card.
Before we start changes related to Time Card, have a look at the below image and understand the basic parts of a Time Card.

Step 1. Define a new Context, Segment in OTL Information Type Descriptive Flexfield
2. Cost Center field is to be removed.
3. State location information should be available to the Approver on Mass Timecard Approval screen and the Workflow notification page.
To keep the changes simple, In this entry I will cover only the steps required for the addition of new Context OHUGLOCATION in the OTL Time Store and the further steps to create/add the corresponding mapping component which will allow this value to get stored in proper place in Time Store without any code change. As we are talking about cost center attribute, its clear that it is a Payroll Time Card.
Before we start changes related to Time Card, have a look at the below image and understand the basic parts of a Time Card.

Step 1. Define a new Context, Segment in OTL Information Type Descriptive Flexfield
- Navigate to System Administration -> Application -> Flexfield -> Descriptive -> Segments
- Query for “OTL Information Type” in the Title field.
- Unfreeze Flexfield Definition.
- Create a new Context named OHUGLOCATION.
- Create a segment with values
Column : Attribute1

Step 2. Generate Flexfield and Mapping process
- From OTL Application Developer responsibility, run ‘Generate Flexfield and Mapping Information’ Process with the parameters
Delete Definitions : No
Effective Date : Current Date
- Other parameters are optional.

Step 3. Mapping Components
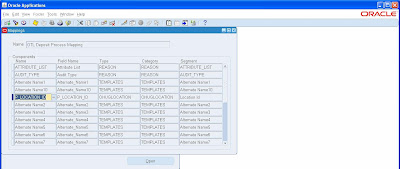
Create a mapping component with values as shown in the screenshot

Step 4. Add Mapping component to Deposit Process

In case you want to save the new attribute information in the existing context, segment of the OTL Time Store like Dummy Element Context or Cost Context, then above steps are not required. Similarly, the mapping components can be modified to change the storage location of the time attributes.
We will see the Time Card layout related changes in the next blog entry.
No comments:
Post a Comment